Sunday Share #34 - Currently

Just a quick Sunday Share from me this week...here's what I am currently keeping, making, enjoying, reading, organising, and loving.

I have been keeping a close eye on Miss B this week. She has been unwell, which lead to a mild Asthma attack and croup-like symptoms mid-week. Thankfully, she is feeling much better and should be returning to school this week. 

Making: cardboard cars at Mainly Music. We love Mainly Music, and this week we made different forms of transport using cardboard boxes. Master M loved 'driving' around in his giraffe themed car - he kept saying 'choo-choo' though, so maybe he thinks it's a train, like everything else that moves. 
Enjoying: a day relieving in my friends classroom. I was a little nervous at first but she has a wonderful class, who made me feel very welcome. I look forward to going back to Room 14 again this week. 

Reading: The Magic School Bus books. In fact, this week for Book Character Day, I dressed up as Ms Frizzle and everyone loved it! "Tooooo the Bus"

Organising: Coffee Group this week at our place. I can't wait to see our friends. Our group met at Ante-natal class in December 2013 and have been meeting every month since Master M was 3 weeks old (born March 2014). This week we will be making a Father's Day craft, which reminds me, I need to get my craft stuff out of the office. 

Loving: this PLAY IDEA: Spaghetti Sensory Play for Babies & Toddlers - by my Guest Blogger, Maria from Pastels and Macarons. Messy, fun and great for your little one's development. 
*Guest Post Maria - Pastels & Macarons
Starts Monday 31st August. Will you join me? Read more about the challenge here


Charlene

Follow me on Facebook // Instagram // Twitter // Pinterest 

Linking up with 
Becky from Choose Happy - Currently series
4

Organising My Home: The #31Days2GetOrganized Challenge


It's time to wave good bye to Winter and say Hello to Spring! A perfect time to get our homes clean, de-cluttered and organised.

Do you feel overwhelmed by the piles of 'stuff' located in different areas of your home, have too many clothes and plastic containers or have an avalanche of washing to fold? I do!
22

PLAY IDEA: Spaghetti Sensory Play for Babies and Toddlers

pasta2pasta5
Hi guys!

My name is Maria and I blog over at Pastels & Macarons. A blog about all things female and motherhood. The main things I blog about are mums, kids, babies, home decor, DIY Projects, Craft and Travel. I'm so happy to be guest blogging for Charlene!

I have two sons. Locky my 26 month old and Cooper my baby who is 10 months old. I'm always looking for ways to entertain my kids with new and fun activities even if it means cleaning up masses of mess! Sensory play is so much fun and so vital for their development.

I decided to give Spaghetti play a go with Cooper to see if he enjoyed it and how he went about playing with it.
7

Taking Stock - August 2015

Taking Stock is one of my favourite posts I share on the blog. It's a chance to reflect on the month, in a creative way. Pip from Meet Me At Mikes is the mastermind behind this amazing idea. If you are a blogger, join in the fun and take stock. Here's my Taking Stock for August. 

10

Sunday Share #33 - Currently

Hi there, how was your week? 
We've had a pretty good week, busy but good. Attending Mainly Music & PLAY, and going on a Road Trip with my parents - Not to mention, more unpacking, more organising and more fun in the sun (when it co-operated). 

Our highlights from the week are: meeting these two little lambs at Playcentre on Friday. Master M thought they were pretty cool and so did the other toddlers. My son kept following the lambs around the centre and patting them when ever he got a chance. We even had a new entrant class (5 year olds) from the school next door come over to meet the lambs. A couple of the students were reading books about lambs, and next thing they hear the lambs baa-ing, so the teacher asked if she could bring her class over. How cool is that? What a great experience for young children. It's all about Making Connections!
Master M making new friends
The other highlight from our week was surprising my Aunty (my Mum's sister), and help celebrate her 60th birthday. I share a few more details below so let's get stuck in, here's what I have been currently watching, making, feeling, organising and loving? 

Watching: my Aunty's face as we all shouted "SURPRISE".  My Aunty's two daughters organised a surprise birthday party to celebrate her 60th and she was definitely surprised. She thought she was coming over for an early birthday party for her grandson, but instead - the birthday person was her. She had a great night, and it was awesome catching up with family and friends. It was really good to see and chat my too Nana too. I love my family - they are pretty amazing. 

Making: Earlier this week, a friend gave me a bag of lemons, so I made a Lemon Cake. It was delicious - you have to try it for yourself. (Pin it for later)  

I have also been making Finger Paint for the kids. Finger painting is such an easy and fun messy play activity. The kids will LOVE it and so will you! 

Feeling: overwhelmed! Next week, I am attending a Parent Information Evening at the Intermediate School that Miss B will be attending next year! Eek! I can't believe my daughter only about 4 months left of primary school. She has grown so much in the past 5 years. I shared this photo a while ago on my Instagram...
Miss B - THEN (5 years old) and NOW (10 years old)
Organising: my 'plastics' drawer  drawers. It's one of those areas in the kitchen that gets completely ruined by my 17 month old almost everyday (several times, actually). He gets free range of the plastics drawers, but when it comes to putting everything back in, the containers/lids are just chucked in, where ever they will fit (Does that happen to you?).  I didn't really have a system, other than one drawer was his (his plates etc) and the other one  two were for general use. After, a bit of organisation and new systems in place, clean up is a lot easier, because I am finding he only takes one or two things out at a time, as opposed to every.single.container! I will be sharing before and after photos soon. 

Loving: THIS idea, by Mum of 3, Kortney Brady. She recently shared a photo of how she organises two of her children for school, using 6 drawer clear organisers. This level of organisation makes me smile. You can follow her on Instagram @Kortneybrady or @kortneybrady_tiu

What are you currently watching, making, feeling, organising and loving? 
Charlene 
xxx

Follow me on Facebook // Instagram // Twitter // Pinterest 

Linking up with Becky from Choose Happy - Currently series
6

PLAY IDEA: Finger Painting

Messy play gives children the opportunity to experience a wide range of sensory experiences.  It helps with hand-eye co-ordination, exploring new textures, learning about colour mixing, patterns, and designs. 

Finger painting is a great messy play activity. It encourages children to explore through the senses of touch and sight. The good thing about finger painting is that you don't need a lot of additional equipment - children are encouraged to use their hands, fingers, feet and bodies to experiment. 

This finger paint recipe is from "Recipes for Messy Play". There are two recipes for you to try at home - cooked and uncooked. You can use tempera paint powder or a non-toxic paint to add colour.
For the purpose of this post, I have used food colouring, mixing it in with a stirrer, before giving it to my toddler. 


COOKED FINGER PAINT
Ingredients
2 cups Cornflour
5 cup Cold water

Method
  1. Mix the cornflour to a smooth paste with a little cold water in a large pot. 
  2. Add 5 cups of cold water and stir over a low heat for about ten minutes until the mixture has thickened to a consistency that will pour slowly and keeps it's shape briefly when moulded or patterned with fingers. 
Colour can be added while the finger paint is being cooked or mixed into the finger paint by children during play.

UNCOOKED FINGER PAINT
Ingredients
2 cups Cornflour
1 cup Cold water
4-5 cups Boiling water
1/4 cup Soap Flakes (optional)

Method
  1. Whisk the cornflour and cold water together in a large bowl until all the cornflour is suspended. 
  2. Pour in 4-5 cups of boiling water while stirring and beat until the mixture 'grabs'. 
  3. Stir thoroughly until the mixture is smooth, thick and translucent. 
Optional: Add the soap flakes if desired and keep stirring. If the mixture seems too thick, carefully add a little more water. The finished finger paint should pour slowly and keep its shape briefly when moulded or patterned with fingers. If the mixture doesn't 'grab', then simply add more cornflour and microwave it for a couple of minutes. 

NOTE: Let the mixture cool before putting it out for children as it's very hot when first made. Soap flakes may irritate if they get it into their eyes, so remember to have some fresh warm water and towels on hand.


Find a suitable area, preferably outdoors, as this activity can get quite messy. Use a table, or a flat surface to 'play' on and remember to have a bucket of warm water and a towel nearby to clean up messy hands when done. Most of all, have fun getting messy with your child!

***SOME IDEAS***
  • Try experimenting with different smells and textures.
  • Give your child some tools, e.g a comb, paint brushes, toy cars to use for making marks in the finger paint. 
  • Add a bit of sand or shaving cream to give the paint a different texture.
  • For a mess-free alternative, check out Mess Free Finger Painting by Happy Mum, Happy Children.
  • For more paint recipes for your toddler - head over to Girl on a Mission's Easy Kids Paint Recipes for more ideas.
Have fun!
Charlene
PIN IT! 
(Hover & Click top left corner of image)


Linking up with
 #ToddlerFunFriday
10

Recipe: Lemon Cake

It seems Mondays are a good day to do some baking. Last week I made some Russian Fudge and it proved to be quite popular among my friends, family and here on the blog. Check out what I made today! Recipe below. 

Yesterday I was given a bag of lemons, and when you are given lemons - you make Lemon Cake! Well I do. Originally, I was going to make a Lemon Slice because a friend of mine gave me a special recipe, however I was missing a couple of ingredients, so I decided to make a Lemon Cake instead. This recipe is really easy and the cake is moist, and oh-so delicious - a perfect treat to have with a nice, hot cup of tea. 

Ingredients
For the Cake
1 cup self-raising flour
1 tspn baking powder
1 pinch of salt
1 tspn vanilla essence
125ml butter (melted)
3/4 cup caster sugar
2 eggs
2 lemons (juice and rind)

For the Glaze
50ml butter
1/2 cup caster sugar
1 lemon juice (large)

Method

  1. Pre-heat the over to about 180oC
  2. Grease cake tin with baking paper and butter
  3. Sift all the dry ingredients together (flour, baking powder, and salt)
  4. In a separate bowl, mix butter and sugar then add eggs one at a time beating in between each egg. Together with the vanilla essence, add the lemon rind and lemon juice
  5. Add the dry ingredients a little bit at a time, to the wet mixture, beat each time
  6. Place mixture in cake tin and bake for about 45 min - 1 hour (depending on your oven)
  7. About 10 minutes before the cake comes out of the oven - melt the sugar, butter and lemon juice together and spoon lemon syrup over the hot cake
  8. Leave on a wire rack to cool

Enjoy!
Charlene

I am linking up with Essentially Jess for #IBOT (I blog on Tuesdays)
and Fabulous Foodie Fridays with Bake Play Smile & Create Bake Make
7

Sunday Share #32: Currently

Another week done and dusted! The year is going ridiculously fast, which means we are getting closer to Spring/Summer here in New Zealand! I have to say, I absolutely love looking at all the trees blossoming at this time of the year...the beautiful pink flowers remind me of my new blog design. 

It's been a another busy week, on and off the blog, so here's what I have been currently watching, making, feeling, planning, organising and loving. 

Watching: the All Blacks win the Bledisloe Cup for ANOTHER year! (sorry for the brag, but I am really proud of our boys in black!) I can't wait for the Rugby World Cup - it's going to be epic!

Making: Delicious Russian Fudge with Miss B and Soapy Sand (PLAY IDEA) with Master M at Playcentre. I look forward to sharing more recipes and toddler activities on the blog, so watch this space. 

Feeling: the love. This week my Facebook page for Teacher by trade Mother by nature reached over 800 Likes. My next milestone is 1000 and I would love to get there before the end of the year. I did a quick blog post this morning Welcoming New Followers

Follow me on Facebook

Planning: on getting started on my office this week. Like I said last week, it's going to be a BIG job, however, I am determined to get stuck in and have some sort of organisation in there. 

Speaking of organising, I am really excited about my "Organising My Home" series, coming to the blog soon! I will be sharing how I organise my home and tips and tricks of how YOU can organise YOUR home, too. If you are interested in following along with this series, please subscribe to my blog, so you don't miss a post. 

Loving: Photography! I signed up to Click Love Grow's Instagram Challenge this week and I have to say I have learned so much in just 7 days. I have gorgeous photos to prove it too. (see below). Now when I take photos, I am thinking about the simple tips that Lou shared each day. If you want to take better photos, I totally recommend you sign up to her challenge. You can sign up here. "7 days to Gorgeous Photos"
Top L-R: Day 1: Fill the frame, Day 2: Soft Light, Day 3: Negative Space, 
Bottom L-R: Day 4: Clear the clutter, Day 5: Let's get black and white, Day 6: The Look Down Shot and Day 7: Getting in shape.

Tell me, what are you currently doing? What was your highlight from the week? 
Charlene x

Follow me on Facebook // Instagram // Twitter // Pinterest // Google+

Linking up with Becky from Choose Happy - Currently series
4

Welcome New Followers

Wow!! My Facebook page has now reached over 800 LIKES. That is amazing!

I wrote this little message on my Facebook page: 


Thank you all so much for liking my page and following Teacher by trade Mother by nature. 
I really do appreciate it. 
For those of you who are new, WELCOME! I am a 30-something Kiwi Mummy Blogger, Teacher and Mother, sharing tidbits of my life, home and family. I love to blog about Motherhood, DIY & Crafts, Toddler activities, home organisation, and much more. 
I will be starting a new series soon - 'Organising My Home' - sharing tips and tricks of how YOU can organise YOUR home too, so stayed tuned for that. 
Grab a cuppa and head over to my blog. Be sure to sign up to my email notifications so you don't miss a post (located in sidebar).
heart emoticon
Be Inspired - Be Creative - Be Yourself.

I would love to reach my next milestone - 1000 LIKES before the end of the year, so if you haven't already liked my page or you know someone who would LIKE Teacher by trade Mother by nature on Facebook, please share or tag them - CLICK HERE. (Thank You in advance). 
 To make you sure don't miss a post, click "Get Notifications" under the LIKED tab and if you really don't want to miss a post, click "See First". 


If you have only just found my blog, WELCOME - it's lovely to have you here. Read more ABOUT ME and if you are NEW? START HERE.

Enjoy the rest of your weekend, I'll be back later with Sunday Share. 
Charlene
xx
0

PLAY IDEA: Soapy Sand

A couple of weeks ago at PLAY, we introduced our toddlers to Soapy Sand. A simple 'messy' play activity that allows your child to be creative, learn about sand and water, strengthen their muscles, and work together with others. 

What you need:
Sand
Dishwashing Liquid
Water
Shallow tray

What to do:
Put some sand into a shallow tray, squirt some dishwashing liquid all over and then add a little bit of water at a time, mixing it together until the sand becomes light and frothy. Yes, it's that simple!

The children can explore the soapy sand by feeling, squishing, massaging, patting, pounding, shaping, moulding and digging.

You might like to add in different equipment e.g. digging equipment such as shovels, spades, scoops and sticks, a range of containers of different shapes and sizes, natural resources such as stones, shells and wood, sieves and tubing of different lengths and types, and a range of vehicles that are not too small.


Talk to your child/children about what they are doing, so they can learn new words. Offer new ideas, and join in with them, exploring the soapy sand together. 

This activity was a hit with our toddlers, and I thoroughly enjoyed it too! Give it a go with your little one!

Thanks for visiting, 
Charlene

Linking up with:

9

Recipe: Russian Fudge

Russian Fudge is one of Miss B's favourite treats, so we decided to make some of our own. I found this recipe created by Jo Seagar, shared on Chelsea Sugar. You will definitely want to bookmark this recipe...this Russian Fudge is creamy and oh-so delicious.

Ingredients

3 1/2 cups of Chelsea White Sugar
125g butter
3 Tbsp Chelsea Golden Syryp (tin)
1/2 cup milk
1/2 tsp salt
200g sweetened condensed milk (half a standard tin)
2 tsp vanilla essence


Method:
1. Place all the ingredients except the vanilla, into a medium-heavy saucepan. 
2. Warm over a gentle heat until the sugar has dissolved about 10-15 minutes. 
3. Bring to a gentle boil and cook for about 5-10 minutes, until it reaches the soft ball stage (120°C).
4. Remove from the heat and add the vanilla.
5. Beat until the fudge is creamy and thick and has lost its gloss.
6. Pour into a greased cake pan. Score the top and break into pieces when cold. 


Enjoy!


#inthepicture
Linking up
#BlogFair with Mummy Do It 
#IBOT with Essentially Jess
21

Sunday Share #31 - Currently + some Exciting News!

Hi there, how are you? How's your week been? 

I have some exciting news...no, I'm not pregnant or engaged...it's something 'blog' related - I bought my own domain www.teacherbytrademotherbynature.com. Woohoo! 

I created this blog almost a year ago*. I wanted a space of my own, a place for me to share tidbits of my life, home & family, and share creative ideas. A place where my readers can be inspired, be creative and be themselves.
*My Facebook page was created in May 2014, and the blog was created in September 2014.

Last week, I saw GoDaddy was having a Special -"Buy your domain for less than $1.50" - it was something I couldn't pass up. It was an opportunity for me to branch out and make my blog MORE real and professional. So I bought it and my blog is now a .COM, not blogspot.co.nz. It's such a cool feeling to know I own my blog name! It's all mine. 

To celebrate my new domain, I decided to give my blog a makeover. I have made several changes to my blog over the past 10+ months of blogging, however this time I did a total redesign of Teacher by trade Mother by nature. Oh-so pretty!
The New and Improved Teacher by trade Mother by nature
I absolutely LOVE the look of my blog, and best of all - I re-designed it myself. Well, I downloaded this gorgeous template, and edited the HTML code to suit my new look. I designed & craeted my own blog header (on PicMonkey). I have designed all of them actually but this is, by far, my favourite. I also created a grab-a-button (found in the sidebar) and chose a girly, chic & professional colour scheme.

Please feel free to have a look around - there is some pretty cool stuff happening on this blog. It is a work-in-progress and I am going back through all my posts and updating them. I am really proud of my little space in the blog-o-sphere. 
What do YOU think of the new design? 

Other than buying my own domain and re-designing my blog (pretty exciting stuff if you are a blogger), here is what I am currently watching, making, feeling, planning, organising and loving. 

Watching: my little boy sleeping in his cot, in his OWN room! My son has been sleeping in a port-a-cot for the past 6 months. From open homes, to moving, and staying with friends, Master M is finally back in his cot (which was originally Miss B's 10 years ago) and he is sleeping in his own room. (tear). I had it in my head that he would be in with us until, at least, Christmas, however it didn't work out like that - the first day/night sleep in our new home, was in HIS room. He is actually sleeping better on his own, so it's been a blessing. I still miss him though, even though is just behind the wall. 

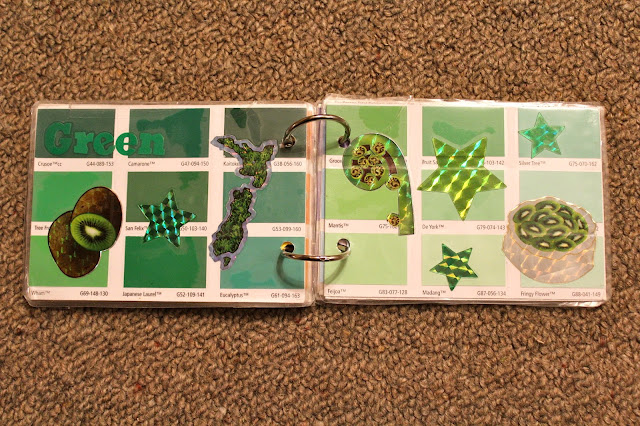
Making: DIY: Homemade Colour Book - I made this book when Master M was 5 months old, a year later and he still loves reading it. 

Feeling: fantastic! That.is.all

Planning: to unpack the last of the boxes that are inside. You wouldn't think we have only been here a week, I have pretty much unpacked the whole house. Although, I still have the office to unpack (it's detached from the house) - it is going to be a BIG job! I am quietly excited about setting up my office. eek!

Organising: my Pantry, Wardrobe & Linen Cupboard this week. Amazing! I shared the below photos on my Facebook page. And it has motivated me to start a new series 'Organising My Home' - Sharing how I, well, you guessed it, organise my home and also sharing some 'quick tips' of how you can too.  Watch this space!

Loving: my home, my family and my blog (oh I really do - it is my happy place).

How are you FEELING? What are you LOVING? Share what you are currently up to in the comments. Have a great week. 
4

DIY: Homemade Colour Book


I made this Colour Book when Master M was only 5 months old. One year later, he still loves it. It's such a great little book and really easy to make. I was inspired by this post over at Craftulate.  

You will need:
Paint swatches (two of each colour)
A range of stickers
Book binding rings (x2)
Hole punch
Glue
Laminator/laminating sheets (optional)
Firstly, lay out your paint swatches so you can see how the book is going to turn out.  Glue the paint swatches back to back in order (see below pattern) to form a book layout.
Cover (white) - Red,
 Red - Orange, 
Orange - Yellow, 
Yellow - Green, 
Green - Blue, 
Blue - Purple, 
Purple - Back of book (white). 
Colour Book Layout
Add a variety of coloured/themed stickers to each page, including the colour word in the top left corner (at this point I laminated my book so it would last longer). Punch two holes in each card and thread two 'book binding rings' through to hold it all together. 

You can either add patterned or scrapbooking paper for a cover,  or use white paint swatches and decorate with coloured or themed stickers like I did, and personalise the book by using your child's name. And just like that, your little one has their very own (made with love) Colour Book. 


My 17 month old son loves his Colour Book (ever since he was 5 months old). He is now looking at the pictures and attempting to say the names of the animals/objects.
 photo name-ttmn-august_zpshrr4gsul.png
Linking up with: My Bored Toddler for #ToddlerFunFriday
11
Back to Top